Trip Report
Prusik Peak/West Ridge
An aesthetic climb with views of Enchantments
- Sun, Aug 11, 2024
- Prusik Peak/West Ridge
- Climbing
- Successful
-

- Road suitable for all vehicles
Sharing interesting things from the climb in addition to route description in Mountain Project. It would be best for people who are climbing the peak soon, and have done some research of the route.
The trail to Prusik Pass was straight forward, after circling around the bump, the climbing line was out of sight there, but showed up again after scrambling up easy blocky terrain, mostly class 2, reaching a huge balanced dish-shaped rock.
Better to gear up and stash pack here instead of where the climb actually begins, this will save a few upward scrambling after hiking back from rappel landing.
There are quite a bit of traverse and down climb, so give follower some slack to avoid pulling them off, also place pros for followers.
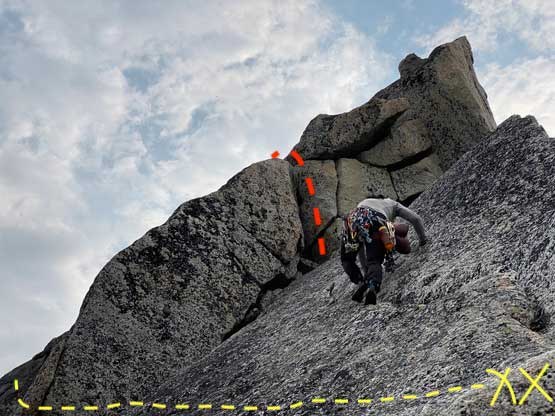
Pitch 1: climbing is 5.6 at most, route finding is challenging as view of pitch 2 route was blocked at the end of pitch 1. It seems the most popular beta is to traverse left on slab, along a horizontal seam that doesn't take any pro (the team after us took this way and confirmed it goes). I chickened out and climbed higher along a right facing flake that takes good pro, and anchored to an existing rappel tat.

Pitch 2: Dasha did an amazing lead climb over an overhanging bulge with stemming and placed cam high on the horizontal crack to avoid rope getting sucked into the crack causing bad drag; then down climbed to the trail. At the end of a pitch is climbing over a rock/bulge - look for good footholds and pull over the bulge.
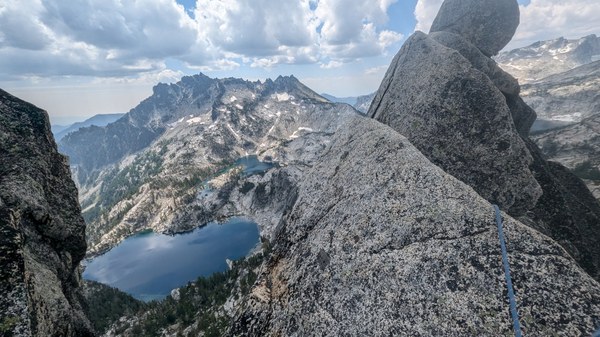
Pitch 3: The slab has plenty of positive features and never felt insecure - it's easier than the 5.7 slab of Liberty Bell/Becky Route, so I would rate it 5.6 at most. Placed a black totem at the bottom of slab without any extension, which caused bad rope drag and I had to make an intermediate anchor right after the au-cheval move on the ridge - it's actually a good sitting belay with 360 degree views. - with the cost of an extra pitch. In hint-sight, I could've communicated with belayer to have her take the piece out after I'm done with the slab.

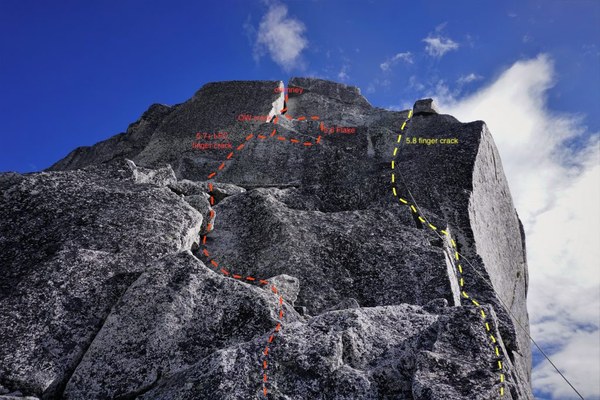
Pitch 4: This is the money with some real climbing. We started the climb on a ledge, OW chimney was directly on top. Climbing up a left facing corner over finger crack(5.7+) with stemming then mantle, got us up on a ledge, to a right facing corner, with an off-width crack with size of #4 BD. We opted for the sweeter left facing flake to the right, make a gear anchor to belay here, climbed up onto another ledge, then traversed on the ledge back to the OW crack. This portion is better protected by two #3s. I managed to get by with one #3 by shuffling cams through the traverse. Dasha was comfortable to have the pros taken out once reaching the OW crack and climb the traverse with risk of pendulum fall. The OW crack now widens enough for body jam and quickly narrows to sweet thin hand/singer size. The wide portion of the crack ended up the crux of the whole climb. Slang a block in the crack as the first pro, took off pack and clipped it on the left side of the harness in order to fit in the wide section, arm bar + shimmy up and establish into a stemming position. Then aided up on a #2 deep in the crack(thanks to my short arm, I think anyone with an arm 2 inches longer should be able to make a solid hand/fist jam). After that comes the true chimney which is wide enough to fit a small person and walk up comfortably.

Descent:
Credit to Dasha for leading rappels and sharing the beta. First station is right at your feet on flat section at the summit. Second station isn't visible from top, rappel ~25m before you see it on climber's left.Third station is visible right below you. From there, there are 2 options. Option 1: we rappelled a bit climbers left and saw a hidden rappel station #4. This rappel goes down a gully even more climbers left and takes you to low angle scramble-able terrain. This is 4 rappels total but scrambling is rather loose. Option 2: rappel straight down to alternative station #4 and straight down again to station #5. More rappels but cleaner scramble.
We took option 1 and scrambled down and climber's right to a well-worn trail, hiked back to balanced rock . As the rappel terrain angle smoothened, the rock became more loose, so test feet before landing to avoid knocking them down. Our rope got snagged on a rock once, which was shaking and likely to fall when we yank the rope, so I opted to scramble up and down to retrieve it.
Gear: Singles of BD #0.2 - 3; with an extra #. 5,.75, 1; a set of nuts; 6 single slings and four double slings; would've preferred an extra #3; placed no nuts.
 Maggie Zhou