Last summer, my fiancé and I moved from Olympia to Seattle. We were excited for the change, but did not anticipate the space problem our move would entail: due to the much higher rent prices, our new city apartment was about a third of the size of our Olympia house.
While we both enjoy our new smaller place (and no more yard maintenance!), finding a home for all our outdoor gear proved challenging. Our apartment was advertised as a two-bedroom, but the second “bedroom” is a square box measuring 9’x9’. I think calling this a bedroom is a joke (a twin bed would take up well over half the space!), and with no garage, this “bedroom” would have to double as our home office and all-important gear room.
We stored our equipment in giant plastic bins for several months, growing more frustrated every time we couldn’t find a piece of gear we needed. I finally sat down and thought through the space problem to make our weekend warrior packing easier. I went through quite a bit of trial and error during this process, but came up with a great solution. I want you to learn from my mistakes, and hope these ideas will help you organize your space and rid yourself of the weekly routine of dumping a giant plastic gear bin on the floor and hoping for the best.
Marie Kondo Your Items
Before any of the actual organization happened, I took a first step that’s not readily apparent in pictures: go through everything and get rid of unnecessary gear! We had so much stuff that we didn’t need! I highly recommend going through your outdoor equipment with a discerning eye and look for items that may fall into one of these categories:
- Gear no longer used because it’s been replaced by something else (how did I have 4 different water filters!?).
- Anything which has gone more than a year without use.
- Outdoor clothing that doesn’t fit, is well past its prime.
- Unusable sentimental items (like my first backpack, which was damaged but had a ton of memories attached to it).
I separated all of this gear and either sold or donated it. This really helped with the space issues, and it felt great to slim down to what we actually need and use. For the Marie Kondo fans out there, it’s basically applying the KonMari Method to your outdoor items!
Wire Shelving and Peg Board
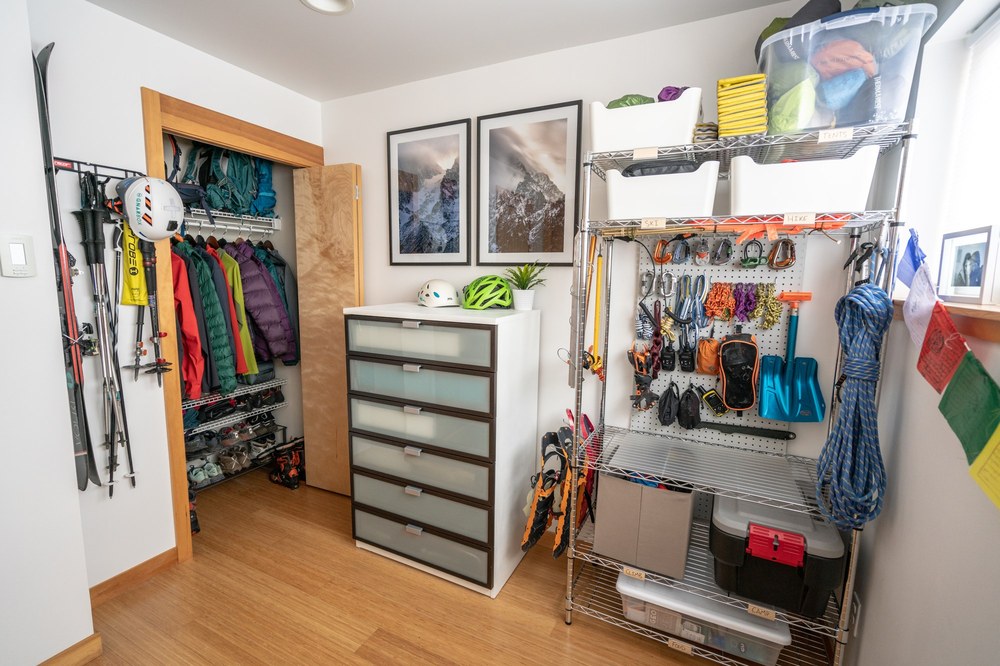
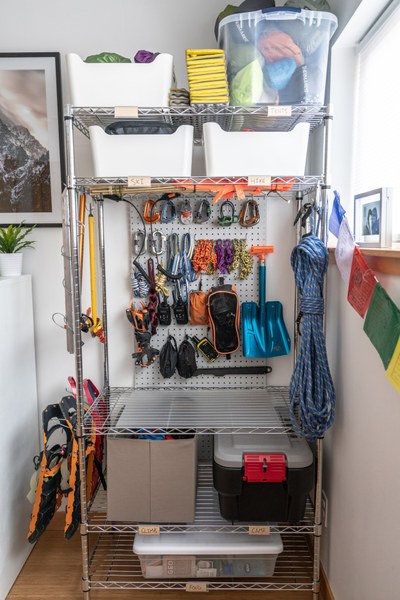
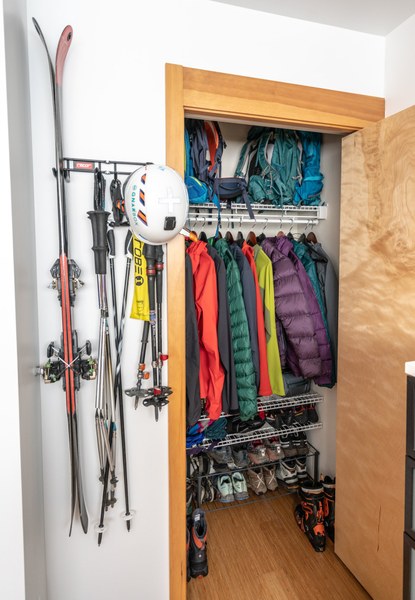
Wire shelving is as great choice for its versatility. You can set the shelves to spacing that works for you. I like having a large opening in the center of the shelf, which gives me a work space to lay out gear as I’m packing and checking to make sure I have the essentials. You can also hang gear like ice axes, ropes, pickets, shovels, and snow shoes to the outside of the shelves with simple hooks found in hardware stores. This is an efficient way to hang larger items that would take up too much shelf space. We got a wall hanging rack for our skis and poles as well.
Peg boards are another great choice, especially to hang climbing and mountaineering gear. I used zip ties to hang the board behind the shelf, which works great. If I decide to move the shelf somewhere else later, the peg board comes with it!
 Photo by Nate Brown
When you think about organizing your gear onto shelves, think about the process of packing for a trip. Do you want to be able to see everything at once? Grouped by type of gear? Organized by season? It’s completely up to you and will probably require thought and testing on your part. Personally, I used separate bins for different activities. I have a bin labeled for hiking, so when I’m packing to go on a hike, just about everything I would need for a typical day hike is in that bin. Another is labeled for camping, and that’s where I can find my stove, mini lantern, sleeping pad etc. This makes packing super-efficient for our different outdoor hobbies.
Another thing to keep in mind when deciding how to organize is to apply the time-tested technique of keeping it simple and easy. Imagine coming home late on a Sunday night after spending the weekend in the mountains: the last thing you want to do is put everything away, so having a simple and easy method is a key element in staying organized. This is why I like having bins and hooks – it’s about as easy as it gets when all I have to do is throw all the gear from my pack into a designated bin (unless it needs cleaning or to dry out, but that’s another article altogether).
Dresser
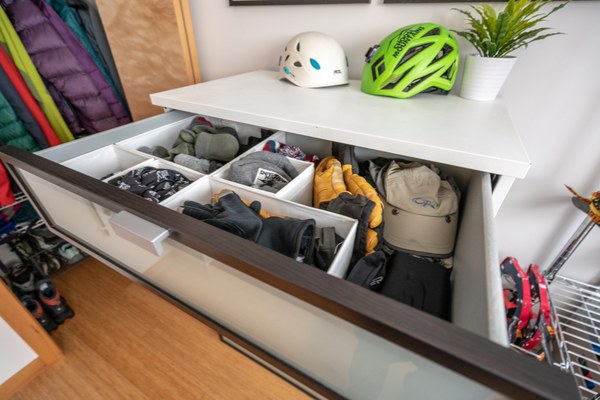
Outdoor activities tend to require a lot of clothing, especially if you play outside year-round and have varied interests like skiing, hiking, mountaineering, trail running, and kayaking! We decided to split a dresser between the two of us for just outdoor clothing.
For all those small items like gloves, buffs, beanies, sunglasses, socks, etc., I bought little IKEA zip up dresser cubes. These cubes help keep everything organized, neatly packed, and are an incredibly efficient use of space. This compartmentalization is also a visual helper when going through the mental checklist for a trip.
 PHOTO BY NATE BROWN
Closet
The closet already had the standard clothes rack and a few shelves, so the only thing I bought was a shoe rack to fit all of our hiking and climbing shoes on the bottom. We hang our coats, and I hid a bunch of other miscellaneous gear on the shelves behind the coats. This includes random items we don’t use too often like the bear can, duffel bag, extra Nalgene bottles, etc. Out of sight, out of mind (until we need them, of course!).
One solution I couldn’t make a perfect fit for was our packs. You can see I fit four of them at the top of the closet, but in total we have six and there was no way I could make those all fit! The solution was keeping the two packs we each use the most in the closet for the current season while the rest go into our tiny crawl-space storage that is a big pain to get into. This is fine since we only change out our packs 2-3 times a year.
Another piece of gear I couldn’t make fit was our sleeping bags. Of course, the problem with sleeping bags is that they are preferably stored completely uncompressed, so the loft is retained in the down. The solution for this was to store those in our master closet. That closet had some long shelves at the top, making them perfect for laying out two sleeping bags!
 Photo by Nate Brown
The Final Touches
I wanted to make this room inviting - a place I’d feel instantly happy walking into. I added art to finish off the look, including two prints of pictures I took in the Enchantments, a mini wooden mountain made by the talented Nick Terrel, a couple plants, and Tibetan prayer flags. Some people like the grungy gear dungeon look, but I personally enjoy a very bright and inviting feel.
In all, this wasn’t that much work (aside from the thought that went into designing it!), and it was cheap. It cost me about $100 (which was totally offset by selling a few of my Marie Kondo’d pieces of gear), and I am very happy with how it all turned out! I imagine I will change things here and there, but for now, it feels like home.
This article originally appeared in our Summer 2019 issue of Mountaineer Magazine. To view the original article in magazine form and read more stories from our publication, click here.
Add a comment
Log in to add comments.This is an awesome, very useful article! I’m so inspired to re-do my gear storage thinking. Thank you! Thank you! Thank you! Carla Jonientz, Olympia
Thanks Carla, I'm glad it was useful!
Hi! Where did you get your ski hanger from/who makes it? Looking for something similar.
Hi Emily! The ski hanger is made Racor! They have a bunch of versions to accommodate those with a lot more skis too.
 Nathaniel Brown