Most of us have done it more than once in our backpacking lives – tear open a foil packet, pour in steaming water from the camp stove, wait ten minutes, then shovel the contents into our mouths in the hope that the quantity is right, the food is palatable, and the salt content doesn’t cause congestive heart failure. Then we rinse and haul the bulky foil packets back out to the trailhead.
Commercial freeze dried meals certainly hold great appeal. Nutrition is improving and the variety of available options is growing, including vegetarian, organic, and gluten-free choices. Still, they’re quite expensive, involve a great deal of excess packaging and bulk, and their flavor and ingredient list can be a bit of a crapshoot.
However, there is an alternative: dehydrating your favorite comfort food at home. It’s much easier and less time-consuming than you think! With a little practice, you can take leftovers from favorite recipes you’ve already made for dinner and adapt them so that you just pop them in the dehydrator overnight, and bingo! By morning it’s ready to be bagged in a Ziploc for your next expedition. The process also works with many frozen casseroles from the grocery store, entrees from the deli counter, and even leftovers from your last restaurant meal.
Dehydrators
First, you need a basic dehydrator. Yes, you can use your oven, but most ovens have minimum temperatures above the recommended 145-160 Fahrenheit for dehydrating. Some dehydrator features I swear by are adjustable temperature settings (veggies and herbs should dry at lower temperatures than meats), the ability to stack on extra trays, and the availability of both mesh and solid plastic ‘jellyroll’ tray liners for different foods. I use a Nesco Snackmaster, but there are fancier, higher-capacity models if you think drying larger quantities of fruits, vegetables, or meats might be in your future.
Choosing a recipe
Recipes that generally dehydrate well include:
- Casseroles
- Stews with thick sauces
- Whole grain/bean mixtures (test them to be sure they rehydrate in a timely way!)
- Thick sauces that can be served over pasta, instant rice, instant mashed potatoes, or instant polenta
If you want food to rehydrate quickly, it’s important to prepare it for the dehydrator by chopping it into small uniform pieces (I for one am not someone who can wait 30 minutes for my food to rehydrate at the end of a long trail day!). This can take some getting used to, particularly for a dish that normally has larger pieces or layers like enchiladas or lasagna, but the flavor will be there! However it’s recommended to control the amount of fat you use in a dehydrator recipe, as fatty recipes won’t store as long after drying.
Conversely, recipes that don’t work as well include:
- Those that require big pieces of meat, veggies, or fruit
- Those that require frying or baking
- Layered dishes (these have to be chopped up for speedy rehydration)
- Multi-pot preparations
- Recipes with high oil content, or are oil-packed, like fish
With a little experience and experimentation, you will soon develop a good sense for what recipes will adapt well and which ones won’t. And of course you can always add freeze-dried components after drying if you find that some ingredients don’t rehydrate well (for example, I use freeze-dried chicken). Experiment!
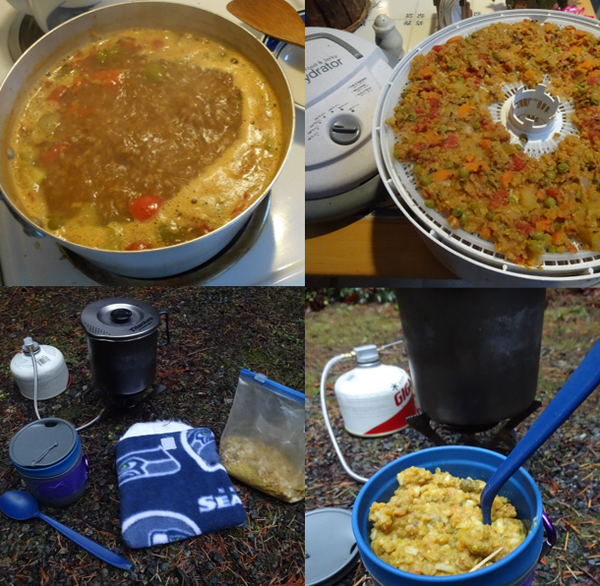
 Argentine lentil stew, from kitchen to dehydrator to trail dinner. Order of photos reads clockwise starting from top left corner.
Step-by-step dehydrated meal prep
1.Cook the entire batch of food to be dehydrated to at least 200 degrees to destroy harmful bacteria, especially if it contains eggs or meat (for leftovers, an extra blast in the microwave or oven might be called for).
2.Chop/puree all components to a uniform small size. I use my food processor for this.
3.Measure the food into servings. I usually consume about 1.5 cups per serving, measured before drying. Make a note of the volume per serving.
4.Spread 1-2 servings onto each dehydrator tray (work out how many cups of the recipe you expect to eat at one sitting). Drippy dishes or sauces go on the solid plastic ‘jellyroll’ trays, while drier dishes can go on the mesh trays. Don’t fill the dehydrator too full! I like to leave a couple of empty trays between full ones to be sure that everything dries uniformly and quickly. You want speedy drying to prevent bacteria growth.
5.Adjust the dehydrator to the appropriate setting for the type of food you’re drying (165 degrees for meat and egg dishes, 145 degrees for vegetables), stack the trays, and go to bed. If you dehydrate during the day, I like to rotate the trays if I have the chance.
6.Come back in 8-10 hours and check the dryness of the food. It’s done when the food is crispy-crumbly (some high-sugar fruits will be fully dry but still pliable and a bit sticky). You may need to stir, rotate trays, and leave it while you go to work. At these temperatures I have not found things to get too dry.
7.Once done, separate the trays and let the food cool completely. Put each serving (or two servings if you’re feeding two people at a meal) into its own Ziploc bag. Include a small slip of paper in the bag with the name of the food, volume of the serving, and the date you packaged it. Push out all the air you can, and toss the bag into the freezer or into a closed bin in a cool place.
Additional tips
- Loading multiple servings into a big bag and scooping out of it throughout the season requires opening the bag multiple times – this means exposing the food to germs and moisture. Not a good thing.
- I have found that fully-dried recipes in a sealed Ziploc will keep for months to over a year in a cool dry space without additional measures like 02 absorbers or vacuum sealing. However, if you’re worried about it and you have room, you can store them in your freezer.
Three ways to rehydrate
1.Take your dehydrated meal out of your pack at lunchtime, put cold water into the Ziploc up to the level of the dry food, and put it back in your pack. By dinnertime, it should be ready!
2.Heat water to a near-boil and pour it into your Ziploc bag, mug, or bowl (if you’re going to put hot water into a Ziploc, they must be the freezer bags, NOT the storage bags!). Put in enough water to barely cover the food. Stir it and wrap the bag in heavy-duty foil or put it into a cozy for 10 minutes or so. Keep it hot for faster and more uniform rehydration.
3.Boil water in your pot in a quantity equal to the volume of your serving, dump in the dried food, and let it boil for 3-5 minutes or until the food is rehydrated and the water is absorbed.
Dehydrating your leftovers is a great way to bring the taste of home on the trail, and to control the ingredients and nutrition in your trail meals. It’s especially handy for those with very specific dietary restrictions, who may really struggle to find commercially freeze dried options they like. I hope you enjoy this flexible, healthy, and tasty alternative to commercial freeze-dried meals. Happy backpacking!
For some of Cheryl’s favorite recipes, visit her list of trail-tested comfort food.
This article originally appeared in our Summer 2022 issue of Mountaineer magazine. To view the original article in magazine form and read more stories from our publication, visit our magazine archive.
 Cheryl Talbert