Though it’s easy to become focused on major muscle groups, it’s important to remind ourselves to take a look at those parts of our bodies that sometimes go unnoticed.
Pelvic alignment is one of these oftforgotten areas, but it’s key to our overall health and wellbeing. The pelvis is the foundation of many of our most-used and powerful muscles, and poor alignment can result in pain and discomfort. One exercise I use when a sacroiliac (SI) joint is stuck or flared up is a 90-90 heel dig with pelvic tilt, as it will help to realign my pelvis. While this movement may not be for everyone, if you have discomfort in either of your SI joints and are looking for something to relieve it, try adding this to your warm-up for a few weeks and see if it helps.
Get in position
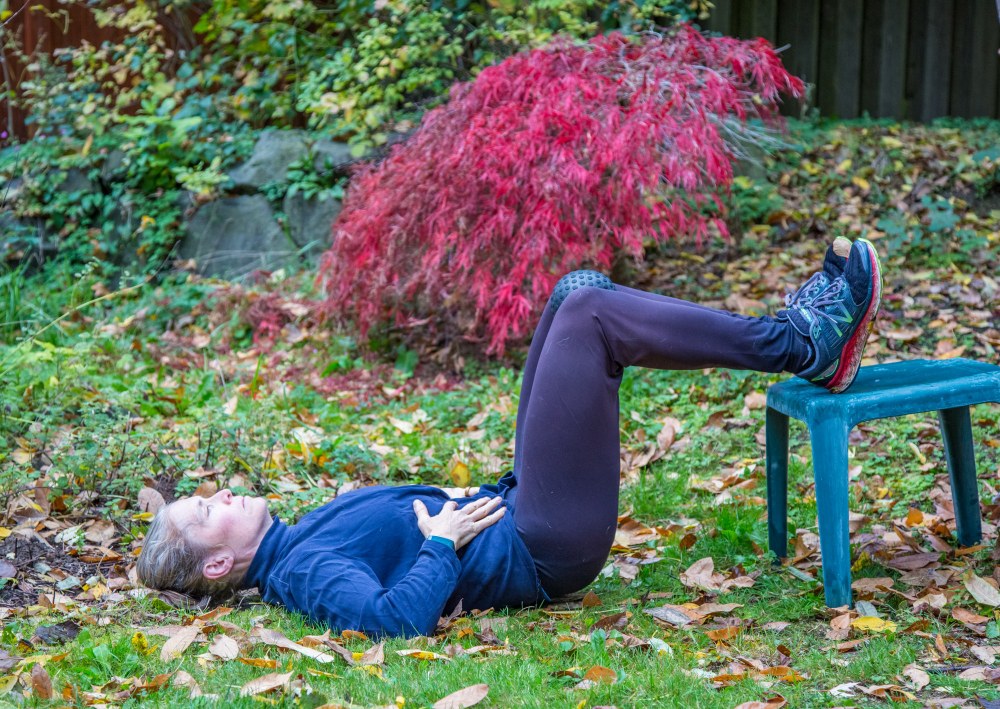
Lie face up on a mat with your heels resting on a chair or bench and your hips, knees, and ankles at right angles. Place a 4-5 inch diameter ball between your knees and a small rolledup towel underneath your neck.
Engage
Rest your hands on the bottom of the rib cage and exhale fully through your mouth, focusing on completely emptying your lungs. Inhale through your nose, focusing on filling your upper lungs only (your rib cage should not move). On your next exhale, dig your heels into the bench and raise your tailbone an inch off the floor. Press your lower back - i.e. the edge of the rib cage - flat to the floor, almost as though you’re trying to round the lower back, rather than arching it. Squeeze your inner thighs into the ball and focus on engaging the left hamstring and inner thigh. To engage the left obliques, imagine the left hip coming ever so slightly up toward the left ribs. You can palpate that area with your left hand to make sure the targeted muscle groups are firing. Because of asymmetries in the body as it relates to organ placement, the left side historically has more issues than the right. Focusing on getting left abductors, hamstrings and obliques stronger, this exercise repositions the pelvis for most people.
Repeat
Relax the hips back to the floor as you inhale, keeping the rib cage held in and down, with your lower abdominals soft. Repeat 10-20 times, exhaling as you lift, testing engagement, and inhaling as you release. Include this exercise in your warm-up and cool down two to four times a week, with two sets of 10-20 repetitions.
Key tips
- Do not raise your hips into a bridge. That is a completely different exercise and might lead to increased pain.
- If you have any pain in your lower back or knees when you do this exercise, shorten your range of motion or discontinue the exercise entirely.
- Avoid overusing the abdominals. Palpate to make sure they’re relaxed and focus on your hamstrings.
- While this exercise may not be for everyone, it’s certainly a good place to start. Resetting the pelvis might help you reduce lower back discomfort by activating the gluteals, hamstrings, and obliques, and supporting core muscles. If you feel less pain after a single set, keep doing it as part of your warm-up. If you don’t feel any relief after including it in a few workouts, it may not be right for you.
Courtenay Schurman is an NSCA-CSCS certified personal trainer, Precision Nutrition Level 2 Certified Nutrition Supercoach, and coowner of Body Results. She specializes in training outdoor athletes. For more how-to exercises or health and wellness tips, visit her website at bodyresults.com or send a question to court@bodyresults.com.
This article originally appeared in our Winter 2020 issue of Mountaineer Magazine. To view the original article in magazine form and read more stories from our publication, visit our magazine archive.
 Courtenay Schurman