We were driving back from the mountains, and the guy at the wheel was ranting. About zippers. Worst invention ever. Absolutely hated them.
Taking a quick glance at what I was wearing, it was clear: I would not be giving up my zippers. However, I could absolutely identify with the experience of having that particular invention let me down. Including in the mountains, when it mattered.
But then, is blaming zippers themselves really fair? They’re everywhere, and most of the time we take them for granted while they quietly do their jobs and take all kinds of abuse, until one day they’ve had enough and start screaming for attention. Sound familiar? I thought so. If your relationship with your zippers could use a little rehabilitation, here are some approaches that might help.
Anatomy of a zipper
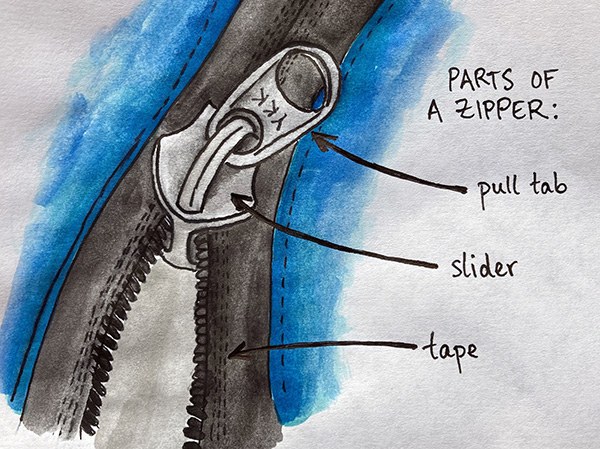
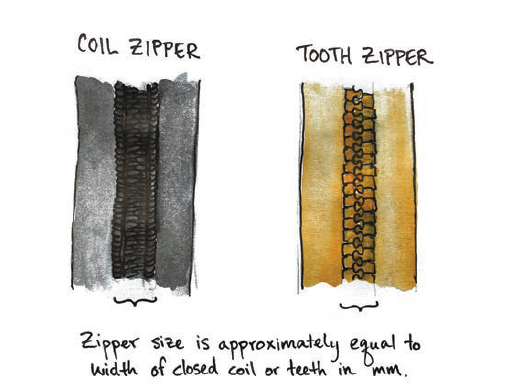
First, let’s be clear on what we’re dealing with. Every zipper has three parts: the tape, slider, and pull. All of these parts need to be compatible with each other, and each part is subject to wear and possible failure. YKK brand zippers are the industry standard for outdoor equipment and come in two basic styles: tooth (Vislon) and coil.
Realistic expectations
Zipper sizes are roughly equivalent to the width of the teeth or coils when the zipper is closed, measured in millimeters. Size standards have changed in recent years. For example, virtually all sleeping bag zippers used to be 8C (8mm-wide coil zipper), but most manufacturers are now using 5C zippers. Likewise, tooth zippers are fantastic for shell jackets because of their greater resistance to abrasion while the jacket is open, but many high-end shells are now constructed with lighter-weight waterproof coil zippers. It’s a sleeker look and eliminates the need for a cover flap, but it’s less durable.
Everyone counts grams, and manufacturers are under pressure to decrease weight without cutting features. As a result, zippers, buckles, webbing, and fabrics are all being downsized to make them lighter, and oftentimes weaker. It’s nice to have less weight to carry in the backcountry, but we also need to be much more careful if we want our equipment to last and not disappoint us. And we might consider using our purchasing power to reward companies that design and build gear that lasts, even if it ends up slightly heavier or with a shorter list of bells and whistles.
Care and maintenance
For all zippers, basic care and maintenance begins with keeping them clean! Protect zippers from dirt, rinse them when needed (right there in in the field if possible), and don’t force them, especially when they are dirty or iced up. Standard metal sliders are subject to corrosion, so rinse them well after contact with salt. Dirt, ice, and salt all put extra wear on both the zipper’s slider and tape.
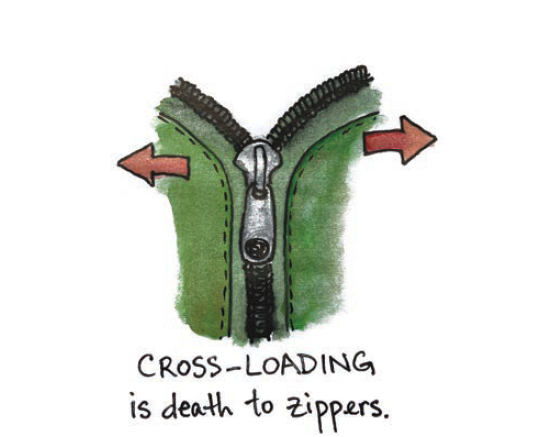
Be gentle and avoid excessive force. Cross-loading is particularly hard on on zippers, so avoid any sideways pull when the zipper is not fully closed. In other words, hold bags and packs closed before zipping, unzip tent doors fully before squeezing through them, use snaps and buckles that help protect zippers from sideways forces, and close zippers completely before laundering.
Most zippers do not need to be lubricated. In fact, attempting to do so can be counterproductive if the lubricant attracts dirt. However, follow the manufacturer’s instructions as some special cases (such as drysuit zippers) do benefit from regular lubrication with an appropriate product.
Repairs
I keep my clothing and equipment around for a long time, and I hate to throw things away if there is any way to repair and get more use out of them. I also have two growing kids and am a sucker for cheap or free gear that needs a bit of work. In my experience, it’s rarely the case that a zipper failure consigns a piece of equipment to the landfill. While some zipper repairs can be seriously complex, in many cases a quick and easy fix can get your gear back in action.
Problem: bad section
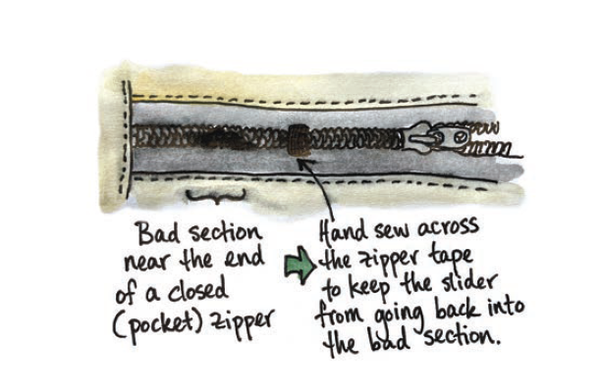
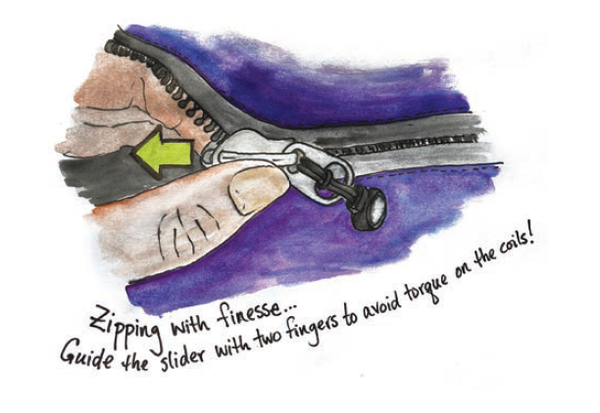
Having a small section turn sour is common in coil tent and jacket zippers, and is a serious inconvenience for obvious reasons. Often the problem slowly-onsets from wear to the coil or the slider (usually both), possibly aggravated by dirt and/or excessive force. In the early stages, cleaning the zipper or using a bit of extra finesse may be enough. In the longer term, the slider or tape will need to be replaced. Changing out the slider is a fairly easy hand-sewing job and often does the trick. There is a fair bit of variation in styles within the same zipper sizes, so read the fine print (number and letters) on the existing slider and/or visit your local outdoor fabric store to find the appropriate replacement.
Note: many people like to use pliers to squeeze the slider tighter against the coils. I do not recommend this method! It may work briefly as a temporary fix, but it hastens the demise of the zipper tape, which is much more difficult to replace than changing out a slider. Once you’re dealing with worn coils, your options are much more limited and usually involve the use of a sewing machine.
Problem: rodents
This happened most recently in my living room with my daughter’s school backpack and one of our pet rats, but if you’ve ever left your pack at the base of a multipitch climb, you may know exactly what I’m talking about. If the bad section is near one end, isolate it by hand-sewing around the coils or teeth to prevent the slider from going into the bad section. Otherwise, you’re in for a full replacement.
Problem: broken-off pull tab
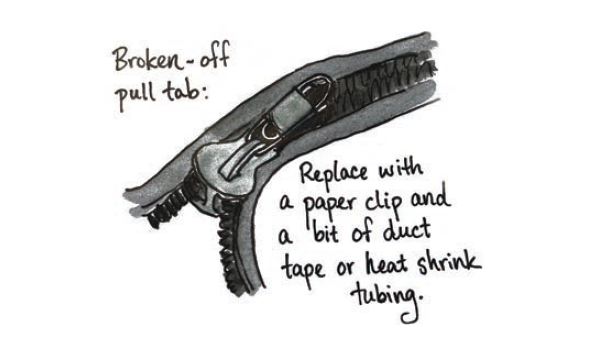
An easy and satisfying fix, try using an ordinary paper clip with a bit of duct tape or heat shrink tubing to keep it from rotating out of place. It is also possible to buy replacement zipper pull tabs or replace the entire slider if you're looking for a more professional result.
Problem: zipper is beyond repair
Time for a replacement. If you have access to a sewing machine, replacing a zipper is not such a difficult thing to do and may put your favorite piece of gear back in action for another decade or so. Go ahead and use a seam ripper to remove the old zipper, then find yourself a replacement. It’s worth considering whether to size up a little for more durability next time – and don’t even think about putting in anything other than a genuine YKK zipper; it’s not worth your time! Pay a visit to your local specialty outdoor fabrics store to get the real thing. For zippers that will be sewn in on both ends, you can buy zipper tape by the yard and select the appropriate slider to go with it. Separating zippers come in specific lengths, but you can always shorten the top ends by sewing them into the garment.
This article originally appeared in our Spring 2022 issue of Mountaineer Magazine. To view the original article in magazine form and read more stories from our publication, visit our magazine archive.
 Esther Andrews